- Program Mode: Manual (t<=30 seconds) or Bulb (t>30 seconds) [mode wheel]
- Auto focus: Manual [display (upper 1)]
- Drive: Single Shot [display (upper 2)]
- ISO: 1600 for faint objects, 400 for brighter objects [display (upper 3)]
- Metering: Spot for solar and lunar, Evaluative for all other [display (upper 4)]
- Quality: Raw [menu 1]
- Red-eye Reduction: Disable [menu 1]
- Flash control: Off [menu 1]
- Auto Lighting Optimizer: Disable [menu 2]
- Expo.comp./AEB: Zero [menu 2]
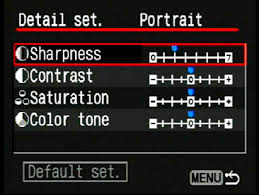
- Picture Style: Standard [menu 2 (Set to modify)]
- Sharpening: 3
- Contrast: +3 for DSO, -3 for star cluster
- Saturation: 0
- White Balance: Custom (set on a gray card in sunshine) [menu 2]
- Color space: sRGB [menu 2]
- Long Exposure Noise Reduction: Off [C.Fn II(1)]
- High-ISO Noise Reduction: Disable [C.Fn II (2)]
- Highlight Tone Priority: Off [C.Fn II (3)]
- Shutter speed: (correct exposure: histogram [INFO. (right side of camera
back)] peaks at about 33% of the distance between the left and right
sides of the graph) - Manual: select speed for 30 seconds or less [wheel behind shutter]
- Bulb for longer than 30 seconds. Attach and set intervalometer:
- Self = elapsed time before exposure sequence begins
- Interval = time between exposures (at least 7 seconds to
ensure that last image completely downloads before beginning
another - Long = length of exposure
- Frames = number of exposures desired
- Mirror lock up: Enable [C.Fn III(5)]
- Image review: Off [menu 1]
dimension of the frame aligns E-W. If another orientation is desired, then
rotate the telescope inside the mount rings instead of rotating the camera
- Test shots:
- Focus
- Slew to a bright star
- Use EOS Utility to control the camera
- Select live view
- Zoom in on a target star
- Install a Bahtinov mask
- Carefully adjust focus
- Lock the focuser
- Remove the mask
- Slew to the target object
- Use high ISO and low Tv as necessary to find the object
- Take as many as frames as needed to determine Tv, ISO, accessory
lenses, and orientation of frame
- ISO:
- Faint DSO: 1600
- Bright star Clusters: 100 or 200
- Tv: Histogram peak is at 20% to 40%
- Flat Frames: (Make a record of image numbers)
- Focus, and tighten focus lock screws
- Do not change orientation of camera on the scope after this
step (If necessary to change camera orientation, twist scope in
rings mounts instead of twisting the camera) - Place an even, diffuse light source on front of the telescope
objective lens. E.g. light box (Don Goldman's light box design)
or tablet with display at the brightest setting - Install eyepiece cap
- Set ISO=100
- Set camera Mode to Av
- Take 25 frames, noting Tv. If Tv is greater than one second, then
take one flat dark frame for each flat light frame at the same ISO
and Tv. Histogram is centered left to right when exposed correctly,
and narrow when the optical system is naturally flat. - Return to ISO determined with test shots
- Light Frames: (Make a record of image numbers)
- Use Tv, and ISO from test frame
- Number of frames
- Dark Frames:(Make a record of image numbers)
- Remove camera from scope
- Install eyepiece cap
- Install body cap over the lens opening
- Take one dark for each light frame at the same temperature, Tv
and ISO as the light frames.
From an urban or suburban observing site with light pollution, your exposures will be short so you will need to shoot a lot of sub-exposures to get enough signal-to-noise ratio in an image. For bright objects like M27, shoot 90 sub-exposures at 1 minute each at ISO 800 at f/8.
For really good images of faint deep-sky objects, try for a total exposure time of 1 to 4 hours, depending degree of darkness and how faint the object is.
The total number of sub-exposures needed will be determined by the length of an individual sub exposure and the total desired exposure time. If conditions permit 5 minute exposures (for a given combination of ISO, F/stop and sky brightness), and if 2 hours of total exposure time is desired, 24 sub-exposures are needed.